
Oh my goodness – there are only two weeks left of my double One Room Challenge makeovers! Since my last update I’ve been working on some small projects for both rooms – cute cloud shelves for my friend’s space-themed nursery and DIY doors for the bookcase in Chris’ office. Today I thought I’d share how I made these adorable shelves!
New here? Welcome! I’m Casey, the designer and DIY enthusiast behind House by the Bay. I love sharing all the DIY projects my husband and I create in our home, and working with clients to create beautiful spaces on a budget. Nice to meet you!
Catch up on the progress so far: Week 1 – Not One, But TWO Makeovers | Week 2 – Space-Themed Nursery Design | Week 3 – Chris’ New Office Design | Week 4 – Installing the Nursery Mural
My girlfriend found a picture of some cloud shelves online and asked me if it was something we could DIY – of course! (I rarely say no lol) They looked simple enough to recreate and turned out to be a great beginner project for my new scroll saw!
Hands down, I think these cloud shelves are the cutest things to ever come out of our garage!

My finished shelves are about 25″ wide x 8″ tall x 5″ deep, but they could be made to be any finished size you want. I used some pieces of scrap plywood that I had on hand that were 3/4″ thick, but I think they would also be really nice made of a thinner plywood as well.
Supplies DIY Cloud Shelves
For each cloud shelf you will need:
- Plywood for large cloud (back) ~ 28″ x 10″
- Plywood for small cloud (front) ~ 15″ x 6″
- Plywood for shelf bottom ~ 25″ long x 3.5″
- Circular Ruler or stencil (optional, but helpful)
- Scroll saw (this is the one I have)
- Wall fasteners of your choice (I used some keyhole hangers)
- Wood glue/adhesive
- Clamps and/or nail gun
- Primer & Paint (I used this paint)
First, sketch out the cloud design for your larger piece of plywood. I have this circle ruler for quilting (which I have never actually figured how to use for quilting) and it was a BIG help. I just kept drawing circles and half circles lightly until I was happy with the design. Pro Tip: Straighten off the bottom of the cloud to match the thickness of the plywood so the bottom piece will line up perfectly (not pictured).

After running through a few practice sheets and figuring out how to properly tension my blade, I cut my first cloud – go big or go home right?

It wasn’t terrible, but I also need a lot of practice before I even attempt something more delicate!
The small clouds were created in the exact same way, just smaller. Mine are about 12″ wide x 4.25″ tall.
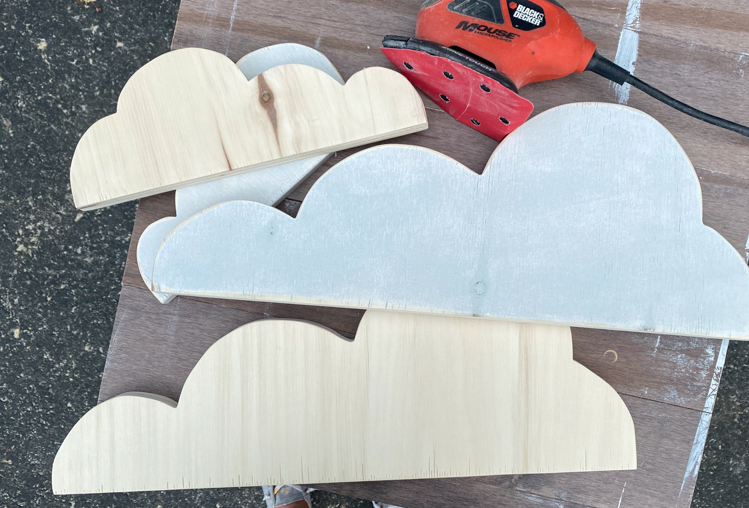
Once all the cloud pieces were cut I sanded all the edges so they were nice and smooth. I cut the length of the bottom piece to exactly the same width of each large cloud. This ensured they lined up perfectly when glued. I waited to measure & cut just in case I messed up the cloud when scrolling ?
Because I decided to use keyhole hangers for these shelves, I cut the channels for them next while the large clouds were still loose pieces (much easier to work with that way). I suck at using the router (and I was being lazy) so I created my channels using the drill press.

Not my best work, but you know what? Only the wall will see them.
Time to attach everything together! I sandwiched the bottom shelf between the two clouds using some Gorilla Glue adhesive I already had in the caulking gun. After clamping everything briefly, I used my nail gun to secure all the pieces together.

Both shelves were covered in two coats of white paint and are now ready to be installed in their new home!

I’ve got one more visit out the nursery to get a few finishing touches installed and then it will be time to photograph – I’m so excited to show you this full, adorable space! Next week will be all about Chris’ office though ?
Thanks for visiting and make sure to go check out all the amazing makeovers in progress by guest participants over at the One Room Challenge!
